Interpreting X-ray Chest PA view in a short time can be confusing and there lies a strong possibility of missing important findings while interpreting it. This may lead to losing numbers in table viva.
Therefore below is a simple approach – how to interpret the x-ray chest PA view.
1. ABCDEFGHI Approach – Headings
Details OF Each Menemonic
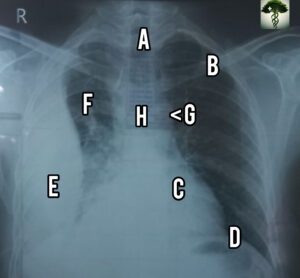
- A – Airway
- B – Bone and soft tissues
- C – Cardiac
- D – Diaphram
- E – Effusions/ extrathoracic
- F – Field, fissures and foreign bodies
- G – Great Vessels/ Gastric bubbles
- H- Hila & mediastinum
- I – Interpretation
A – Airway: Asesses it using Mnemonic PIER
- P – Position: Check whether It is an AP, PA, OR Lateral view.
- I – Inspiration: You should count the posterior ribs, 10 to 11 ribs are seen with a good inspiratory effect.
- E- Exposure: Check out for underexposure or Overexposure Of the film. THE BEST EXPOSURE IS WHEN YOU CAN SEE VERTEBRAL BODIES ACROSS THE HEART IN PA VIEW.
- R- Rotation: Space between the medial clavicle and the spinous process of vertebral bodies are equal or near equal & Secondly Both the clavicles will be at the same level in a good erect x-ray.
B – Bones and soft tissues: CHECK OUT FOR symmetry of bony structure, fractures, osteoporosis, and lesions. Also look for soft tissue pathologies like swelling, subcutaneous air, or foreign bodies.
C –Cardiac – CHECKOUT the heart size. It should be <50% of the chest diameter on PA films and <60% on AP films. Also check for shape, calcifications, and prosthetic valves.
D – Diaphragm: Check the hemidiaphragm for position (the right one is slightly higher than the left due to the liver) and shape (It may be flattened bilaterally in chronic asthma /emphysema, or unilaterally in case of tension pneumothorax or foreign body aspiration). Also, look below the diaphragm for free gas.
E – Effusions – Check out for Effusion like pleural effusion(most common), syn-Pnemonic Effusion, localized effusions, and pericardial effusion.
Check for costophrenic angles which may be blunted in case of effusions.
F – Fields, fissures and foreign bodies –
look lung parenchyma for infiltrates (interstitial vs. alveolar), lymph node enlargement, masses, consolidation (+/- air bronchograms), pneumothoraces, and vascular markings. Note -Vessels should taper and should be almost invisible at the lung periphery.
Evaluate the major and minor fissures for thickening, fluid or change in position.
Check the position of foreign bodies e.g. ETT, NGT, pacemaker leads, central venous lines, etc.
G – Great vessels / gastric bubble: Look For the Aortic Knuckle, Pulmonary vessels & Gastric bubble on the left side below the diaphragm.
H – Hila and mediastinum: LOOK for trachea position (tracheal deviation may indicate a mass effect, e.g. from large goiter, tension pneumothorax, or due to pulling effect secondary to fibrosis or collapse of the lobe), bifurcation level (The left hilum is normally higher than the right), lymphadenopathy, calcifications, masses and for widening of the mediastinum (which may indicate aortic dissection). In children, be careful not to mistake the thymus for a mass!
I – Impression. The most important part is that you must be able to interpret the findings for various pathophysiology of respiratory and cardiac disorders.
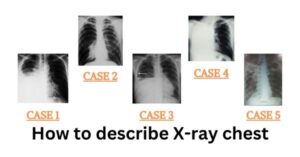
CHECKOUT VIDEO ON QUICK TIPS TO READ X-RAY CHEST ON THE GO
Hey people!!!!!
Good mood and good luck to everyone!!!!!
A very good video for understanding xray
THANKS FOR YOUR VALUABLE OPINION. LIKE, SUBSCRIBE AND SHARE.
DO SUGGEST IF ANY MORE INFORMATION NEEDED.